How to Choose the Right Cold Packs for Shipping?
Choosing the right cold packs for shipping is not simply a matter of selecting the coldest option. It requires matching the pack’s performance to the product, package, route, and expected delivery time. Fresh food, vaccines, laboratory samples, and specialty cosmetics may each need different temperature protection. A pack that works well for a 24-hour delivery could fail during a delayed weekend shipment.
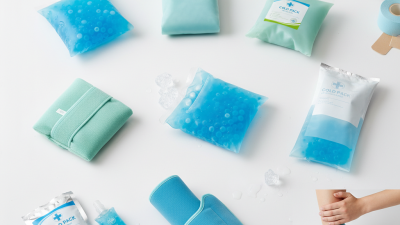
Experience shows that cold packs should be evaluated alongside insulation, product temperature limits, and package size. Gel packs are flexible and useful around irregular items. Water-based packs can provide dependable cooling, but they may become heavy and leak if poorly sealed. Phase-change materials offer more controlled temperatures when a shipment requires a narrow range. Still, their benefits can be reduced by incorrect conditioning or insufficient insulation.
Small details matter.
Before choosing cold packs, confirm the product’s safe temperature range and measure the package’s internal space. Consider summer heat, winter exposure, handling delays, and the time between packing and delivery. A simple test shipment can reveal warm corners, condensation, or unexpected freezing. That test is worth the effort. It may also expose an assumption that looked reasonable on paper.
Reliable packaging decisions should be supported by manufacturer data, documented testing, and practical shipping experience. No single cold pack suits every shipment. This guide explains how to compare pack types, estimate cooling needs, prevent common packing errors, and build a more dependable cold-chain process. The goal is not merely to keep a box cold, but to protect its contents throughout the journey.

Define the Temperature and Handling Needs of Your Shipment
How to Choose the Right Cold Packs for Shipping?
Define the Temperature and Handling Needs of Your Shipment
Start with the product’s actual temperature requirement, not a general label such as “keep cool.” A medicine may need 2–8°C, while fresh food might tolerate a broader range. Confirm the acceptable minimum and maximum temperatures before choosing a cold pack. Even a short freeze can damage sensitive liquids, creams, or biological materials.
Match the pack to the shipment’s weight, insulation, and expected transit time. A small parcel crossing one city needs less cooling than a heavy box traveling for three days. Consider weekends, customs delays, warehouse storage, and summer loading areas. Precondition packs according to tested instructions. Frozen packs can create dangerous cold spots when placed directly beside the product. Use a divider when needed.
Handling matters as much as temperature. Packs may be dropped, squeezed, or left in a delivery van. Select packaging that keeps the payload stable after movement. Add a temperature indicator or data logger when the shipment has strict limits. Test a complete package in realistic conditions. One of my early tests used an empty carton, and the results were misleading. The real product held heat differently. That mistake changed our process. We now test full and partial loads, inspect condensation, and record pack placement. Results can still vary. Recheck them when seasons, routes, or package sizes change.
How to Choose the Right Cold Packs for Shipping?
Define the Temperature and Handling Needs of Your Shipment
Select the coolant according to the required payload temperature, transit duration, and handling environment. Water-based and gel packs are commonly used for chilled shipments, temperature-controlled phase-change materials provide a narrower target range, and dry ice is intended for deeply frozen products.
The temperature bands shown are typical planning ranges, not performance guarantees. Actual results depend on pack mass, insulation, ambient conditions, preconditioning, shipment size, and transport time. Dry ice sublimates at −78.5°C and requires ventilation and compliant handling.
Compare Cold Pack Types by Cooling Performance and Use Case
Choosing the right cold pack starts with the shipment’s temperature target. Gel packs offer flexible contact around small cartons and usually provide steady cooling for short journeys. Water-based packs are economical and hold useful thermal mass, but they can freeze solid and leave gaps around the product. Handle them carefully.
Phase-change packs are more precise. They are designed to change state near a selected temperature, helping protect temperature-sensitive goods from excessive freezing. This makes them suitable for vaccines, laboratory samples, and fresh foods requiring a narrow range.
Their performance depends on correct conditioning, not just freezer time. Follow the supplier’s conditioning instructions and confirm the pack’s core temperature before packing.
Use thicker gel packs for overnight shipments with moderate insulation. Choose phase-change packs when temperature control matters more than price. For longer routes, combine sufficient pack mass with a tested insulated container.
Pack placement also matters; surrounding the product often reduces warm spots. In practical packing trials, I have found that extra packs can sometimes damage delicate items through overcooling.
More is not always safer. A simple temperature logger can reveal problems that a frozen pack cannot show. Test the complete package during a realistic route, including delays, handling, and outdoor heat. One weakness remains: laboratory results may not match every delivery. Recheck the design when seasons, product size, or transport times change.
Match Pack Size and Quantity to Product Volume and Transit Time
Choosing the right cold packs starts with the product volume inside each shipping box. A small carton with 500 milliliters of temperature-sensitive goods needs a different setup from a box holding five liters. Start with volume. Measure the actual product space, then account for insulation, cushioning, and empty air. Excess air can increase temperature changes during transit.
Pack size matters because larger packs usually provide longer cooling, but they may waste space in smaller cartons. Several smaller packs can surround the product more evenly. They also offer better flexibility when box sizes change. However, too many packs may freeze delicate products or leave insufficient room for cushioning. I have seen shipments fail because the pack quantity was chosen by weight alone.
Transit changes everything. A one-day route may need fewer packs than a three-day journey, especially during summer or when delays are common. Consider warehouse time, carrier handoffs, weekend storage, and the warmest expected conditions. Precondition packs consistently, and place them according to the product’s handling requirements. Test the complete package with temperature sensors before regular shipping. Test before shipping. No formula is perfect. Real routes can expose weak assumptions, so review temperature data and adjust pack size, quantity, or layout when results fall short.
How to Choose the Right Cold Packs for Shipping? - Match Pack Size and Quantity to Product Volume and Transit Time
| Product Volume |
Typical Insulated Carton Size |
Expected Transit Time |
Recommended Cold-Pack Format |
Suggested Quantity |
Approx. Total Coolant Mass |
Recommended Placement |
Planning Guidance |
| Up to 1 L |
20 × 15 × 15 cm |
Up to 24 hours |
Small gel packs, approximately 227 g each |
2 packs |
Approximately 454 g |
One pack above and one below the product |
Suitable for small, pre-chilled items with limited empty space. |
| 1–3 L |
30 × 20 × 20 cm |
24–48 hours |
Medium gel packs, approximately 454 g each |
4 packs |
Approximately 1.8 kg |
Surround the product on the top, bottom, and sides |
Use when the shipment contains several small units or moderate thermal load. |
| 3–6 L |
40 × 30 × 25 cm |
24–48 hours |
Medium gel packs, approximately 454 g each |
6 packs |
Approximately 2.7 kg |
Evenly distribute around all sides of the payload |
Increase the quantity if the carton has significant headspace or faces high ambient heat. |
| 6–12 L |
50 × 35 × 30 cm |
48–72 hours |
Large gel packs, approximately 907 g each |
8 packs |
Approximately 7.3 kg |
Use a balanced top, bottom, and side-wall arrangement |
Appropriate as a starting configuration for longer domestic or regional delivery. |
| 12–20 L |
60 × 40 × 35 cm |
48–72 hours |
Large gel packs, approximately 907 g each |
10–12 packs |
Approximately 9.1–10.9 kg |
Create a continuous thermal barrier around the payload |
Check carton weight, internal space, and handling limits before finalizing the design. |
| 20–30 L |
70 × 45 × 40 cm |
72–96 hours |
Large gel packs, approximately 907 g each |
14–16 packs |
Approximately 12.7–14.5 kg |
Layer packs between product rows and along the carton perimeter |
Use thermal testing for extended transit, summer conditions, or temperature-sensitive products. |
Planning assumptions: These quantities are starting-point estimates for pre-chilled products shipped in an insulated container at approximately 20–30 °C ambient temperature, with limited headspace and a target range of 2–8 °C. Actual performance depends on insulation thickness, pack formulation, product starting temperature, carton geometry, seasonal conditions, and carrier delays. Conduct a thermal qualification test using the longest expected transit time before routine shipment.
Check Packaging Compatibility, Safety, and Regulatory Requirements
Choosing the right cold pack starts with packaging compatibility, not temperature alone. Measure the pack against the insulated shipper, dividers, and product container. A tight fit reduces movement during handling. It also prevents sharp edges from pressing against fragile packaging.
Test the complete package in realistic conditions. Place cold packs beside the product, then check for condensation, gel leakage, and crushed cartons. Some packs become rigid when frozen and can damage glass or thin plastic. Others soften quickly and may not protect temperature-sensitive goods for the required transit time. Use absorbent material when appropriate, but never treat it as a substitute for a leak-resistant pack. Small details matter.
Safety and regulatory checks should be documented before routine shipments begin. Request the pack’s Safety Data Sheet, material information, and handling instructions from the supplier. Confirm whether the contents require special labeling, disposal procedures, or transport controls in the destination market. Requirements can differ by country, carrier, and shipping method. Do not assume a familiar gel pack is automatically unrestricted. A practical mistake is testing only the pack, rather than the finished parcel. I would repeat trials after changing carton size, insulation, or seasonal shipping conditions. Keep temperature records, inspection photos, and written acceptance criteria for each configuration.
Validate the Packing Method Through Temperature Testing
How to Choose the Right Cold Packs for Shipping?
A cold pack is not validated by its advertised duration alone. The packing method must be tested with the actual product, container, insulation, and shipping route. Start by defining the required temperature range and maximum transit time. Then place calibrated temperature loggers beside the payload, not only near the cold packs. Test the warmest expected condition, such as a sealed parcel left on a loading dock at 30°C. Include the coldest realistic condition too. Frozen packs can damage sensitive products through direct contact.
Use several pack arrangements and record temperatures at regular intervals. Test different conditioning times, pack quantities, and empty spaces inside the box. A practical trial should imitate real handling, including delays and repeated opening during inspection. Keep photographs, logger records, pack specifications, and test dates together. This documentation supports consistent decisions and helps another reviewer repeat the work.
My first trial once looked successful because the average temperature was acceptable. Later, one corner became too warm. The lesson was uncomfortable but useful: averages can hide failure.
Tips:
Use at least three test shipments when possible. Mark logger locations clearly. Avoid placing packs directly against delicate contents. Check calibration before testing. Repeat the test after changing box size, product weight, or pack conditioning. If results vary widely, investigate the packing process instead of choosing the lowest-cost pack. Small gaps matter. So does human handling.